Skip to Content (Press Enter) Skip to Footer (Press Enter)

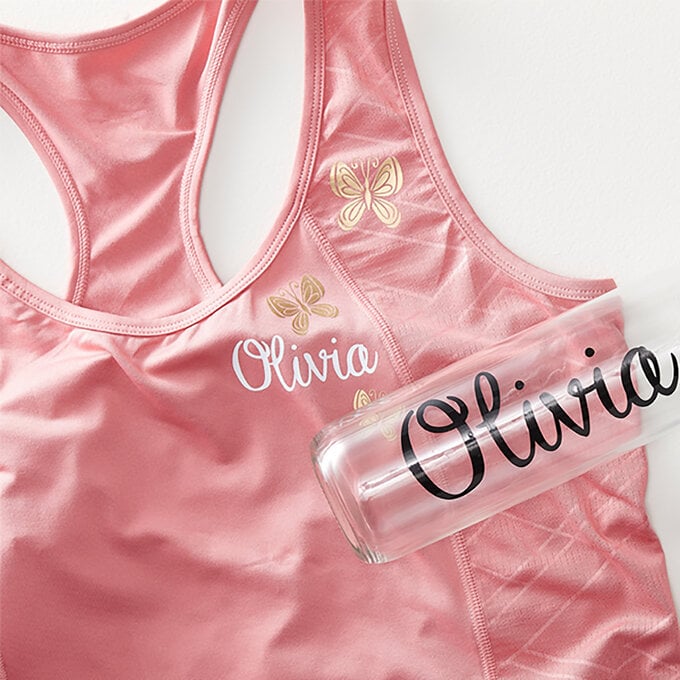
Cricut: How to Make a Personalised Baking Hamper

Level
Intermediate
Time
1+ days
Budget
30+

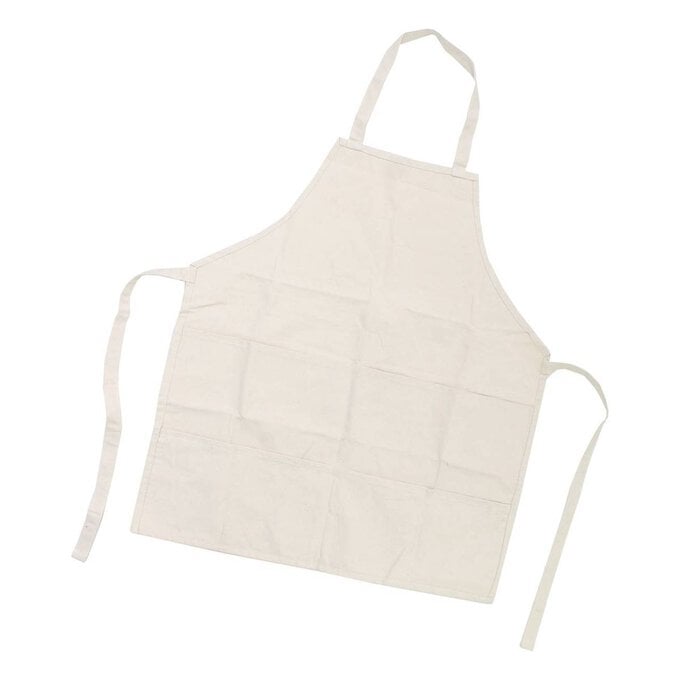
This personalised hamper is the ideal gift for aspiring bakers! It's decorated with a basswood sign and filled with customised jars to store all the essentials, as well as a matching recipe box. A monogram mug and personalised apron finish everything off perfectly.

All of the projects can be made on the Cricut Maker, Explore Air 2 or Joy, except for the basswood sign, which must be made with the Cricut Maker.

Project and instructions by Mike Aspinall from The Crafty Gentleman

Discover more Cricut projects here >

Please note: This project contains paid-for content from Cricut's Design Space app. Screen reference images are taken from the desktop version of Design Space.

You will need

Is $ 13.00

3 for 2 on Selected Digital Cutting Consumables and Accessories
Quantity: 1

Subtotal

Is $ 13.00

Is $ 18.00

3 for 2 on Selected Digital Cutting Consumables and Accessories
Quantity: 1

Subtotal

Is $ 18.00

Is $ 41.00

3 for 2 on Selected Digital Cutting Consumables and Accessories
Quantity: 1

Subtotal

Is $ 41.00

Is $ 65.00

3 for 2 on Selected Digital Cutting Consumables and Accessories
Quantity: 1

Subtotal

Is $ 65.00

Is $ 182.00

Quantity: 1

Subtotal

Is $ 182.00

Is $ 13.00

3 for 2 on Selected Digital Cutting Consumables and Accessories
Quantity: 1

Subtotal

Is $ 13.00

Is $ 15.00 , was $ 16.00

Quantity: 1

Subtotal

Is $ 15.00 , was $ 16.00

Is $ 6.49

Quantity: 1

Subtotal

Is $ 6.49

Is $ 5.49

Quantity: 1

Subtotal

Is $ 5.49

Is $ 6.49

Quantity: 1

Subtotal

Is $ 6.49

Is $ 12.00

Quantity: 1

Subtotal

Is $ 12.00

Is $ 15.00

Quantity: 1

Subtotal

Is $ 15.00

Is $ 6.49

Quantity: 1

Subtotal

Is $ 6.49

Is $ 4.49

Quantity: 1

Subtotal

Is $ 4.49

Is $ 574.00

Quantity: 1

Subtotal

Is $ 574.00

Is $ 13.00

3 for 2 on Selected Digital Cutting Consumables and Accessories
Quantity: 1

Subtotal

Is $ 13.00

Is $ 13.00

3 for 2 on Selected Digital Cutting Consumables and Accessories
Quantity: 1

Subtotal

Is $ 13.00

Is $ 13.00

3 for 2 on Selected Digital Cutting Consumables and Accessories
Quantity: 1

Subtotal

Is $ 13.00

You’ve viewed 2 of 18 products

You’ve viewed 4 of 18 products

Total:

How to make

You will also need:

* Cricut permanent vinyl in meadow sampler

* Enamel mug

* Cricut Design Space app installed on your Mac, PC or laptop

Basswood Sign: Step 1

Open the Cricut Design Space app and start a new project, open the “Text' menu from the toolbar at the bottom of the screen. Search “Quirky script” in the search bar. Select the “Quirky script” font.

cricut_how_to_make_a_personalised_baking_hamper_cricut-hamper_step-1.png?sw=680&q=85
Basswood Sign: Step 2
Type “Yum!” into the text box that appears on screen.
Cricut_How_to_make_a_personalised_baking_hamper_Cricut%20hamper_step%202%20%281%29.png??sw=680&q=85
Basswood Sign: Step 3
In the toolbar, click the small arrow next to the ‘Advanced’ option, then select ‘Ungroup to letters’. This will break up the word into separate letters that can be moved independently.
Cricut_How_to_make_a_personalised_baking_hamper_Cricut%20hamper_step%203.png?sw=680&q=85
Basswood Sign: Step 4
Drag the letters and exclamation point together, so they all are touching and overlap slightly.
Cricut_How_to_make_a_personalised_baking_hamper_Cricut%20hamper_step%204.png?sw=680&q=85
Basswood Sign: Step 5
Select all letters and exclamation point, and click the ‘weld’ button to join them back together into one image.
Cricut_How_to_make_a_personalised_baking_hamper_Cricut%20hamper_step%205.png?sw=680&q=85
Basswood Sign: Step 6
Resize the image to 25cm wide.
Cricut_How_to_make_a_personalised_baking_hamper_Cricut%20hamper_step%206.png?sw=680&q=85
Basswood Sign: Step 7
Click the green ‘Make it’ button. You'll then be taken through to the mat preview screen.
Cricut_How_to_make_a_personalised_baking_hamper_Cricut%20hamper_step%207.png?sw=680&q=85
Basswood Sign: Step 8
Peel the plastic cover from your Cricut StrongGrip mat, and stick the basswood to it. Use masking tape to secure the edges of the basswood for extra stability.
Cricut_How_to_make_a_personalised_baking_hamper_Cricut%20hamper_step%208.jpg?sw=680&q=85
Basswood Sign: Step 9
Open the ‘B’ port of your Cricut Maker and insert the knife blade. Close the door to secure it in place.
Cricut_How_to_make_a_personalised_baking_hamper_Cricut%20hamper_step%209.jpg?sw=680&q=85
Basswood Sign: Step 10
Back on the Design Space app, click continue. You'll then be taken through to the machine set-up screen, select Basswood - 1/16” from the "Material Settings" menu.
Cricut_How_to_make_a_personalised_baking_hamper_Cricut%20hamper_step%2010.png?sw=680&q=85
Basswood Sign: Step 11
Follow the onscreen instructions to cut the design. Make sure to slide the white star wheels on the silver bar all the way to the side, so they do not roll over the basswood (the wheels can make marks on the wood). Note that the Maker will pass the knife blade over the basswood multiple times, rather than cutting through the full depth in one go.
Basswood Sign: Step 12
Carefully remove the basswood sign from the Cricut mat.
Cricut_How_to_make_a_personalised_baking_hamper_Cricut%20hamper_step%2012.jpg?sw=680&q=85
Basswood Sign: Step 13
Paint the hamper box and the basswood design and leave to dry fully.
Basswood Sign: Step 14
Stick the basswood design to the box with strong wood glue or double-sided tape.
personalised-baking-hamper_hamper.jpg?sw=680&q=85
Enamel Mug: Step 1

Open the Cricut Design Space app and start a new project. Open the 'images' menu and search for '#M136D279F' and add it to the canvas by clicking the green "Insert" button.

cricut_how_to_make_a_personalised_baking_hamper_cricut-mug_step-1.png?sw=680&q=85
Enamel Mug: Step 2
Once back through to the canvas, open the "Layers" menu and delete all of the layers except for the wobbly lines.
Cricut_How_to_make_a_personalised_baking_hamper_Cricut%20mug_step%202.png?sw=680&q=85
Enamel Mug: Step 3
Open the “Text’ menu from the toolbar. Search “Chip décor” in the search bar. Select the “Chip décor” font.
Cricut_How_to_make_a_personalised_baking_hamper_Cricut%20mug_step%203.png?sw=680&q=85
Enamel Mug: Step 4
Type a letter into the text box that appears on screen.
Cricut_How_to_make_a_personalised_baking_hamper_Cricut%20mug_step%204.png?sw=680&q=85
Enamel Mug: Step 5
Drag the letter over the wobbly lines, and resize them so they look balanced together. When you are happy with the sizes, select both layers and resize them so they will fit onto your mug.
Cricut_How_to_make_a_personalised_baking_hamper_Cricut%20mug_step%205.png?sw=680&q=85
Enamel Mug: Step 6
Click the green ‘Make it’ button. You'll then be taken through to the mat preview screen.
Cricut_How_to_make_a_personalised_baking_hamper_Cricut%20mug_step%206.png?sw=680&q=85
Enamel Mug: Step 7
Fit your Cricut machine with the fine point blade.
Cricut_How_to_make_a_personalised_baking_hamper_Cricut%20mug_step%207.jpg?sw=680&q=85
Enamel Mug: Step 8
Back on the Design Space app click continue. You'll then be taken through to the machine set-up screen, select premium vinyl from the "Material Settings" menu and follow the on screen instructions to cut the design. Make sure to eject the mat and swap the colour of vinyl between cutting each part of the design.
Cricut_How_to_make_a_personalised_baking_hamper_Cricut%20mug_step%208.png?sw=680&q=85
Enamel Mug: Step 9
Remove the cut designs from the Cricut mats and cut away the excess vinyl around the edge of each part of the design, leaving a small border. Use the weeding tools to remove the negative areas from the cut out designs.
Cricut_How_to_make_a_personalised_baking_hamper_Cricut%20mug_step%209.jpg?sw=680&q=85
Enamel Mug: Step 10
Cut out a piece of transfer tape large enough to cover the designs. Stick it directly onto the wobbly lines design, and firmly press it in place.
Enamel Mug: Step 11
Flip the design over, and gently peel the backing plastic away from the transfer tape. This should leave the wobbly lines stuck onto the transfer tape. If it doesn’t quite stick, just press it back down again and give it a firm rub.
Enamel Mug: Step 12
Once the design is in place on the transfer tape, line it up on the enamel mug and stick it in place. Give it a firm rub and peel away the transfer tape to leave the wobbly lines stuck to the mug.
Enamel Mug: Step 13
Repeat these steps to apply the monogram onto the mug, over the top of the wobbly lines. You can reuse the same piece of transfer tape for this.
personalised-baking-hamper_mug.jpg?sw=680&q=85
Jars: Step 1

Open the Cricut Design Space app and start a new project. Open the “Text' menu from the toolbar. Search “Quirky script” in the search bar. Select the “Quirky script” font.

cricut_how_to_make_a_personalised_baking_hamper_cricut-jars_step-1.png?sw=680&q=85
Jars: Step 2
Type the word(s) you wish to feature on your first jar into the text box.
Cricut_How_to_make_a_personalised_baking_hamper_Cricut%20jars_step%202.png?sw=680&q=85
Jars: Step 3
Adjust the letter spacing until you are happy with how the letters look, then select the word and press the ‘weld’ button. Resize the word so it will fit onto your jar.
Cricut_How_to_make_a_personalised_baking_hamper_Cricut%20jars_step%203.png?sw=680&q=85
Jars: Step 4
Repeat steps 1-3 for every jar you wish to label.
Cricut_How_to_make_a_personalised_baking_hamper_Cricut%20jars_step%204.png?sw=680&q=85
Jars: Step 5
Click the green ‘Make it’ button. You'll then be taken through to the mat preview screen.
Cricut_How_to_make_a_personalised_baking_hamper_Cricut%20jars_step%205.png?sw=680&q=85
Jars: Step 6
Open the ‘B’ port of your Cricut Maker and insert the fine point blade. Close the door to secure it in place.
Cricut_How_to_make_a_personalised_baking_hamper_Cricut%20jars_step%206.jpg?sw=680&q=85
Jars: Step 7
Stick your Premium Vinyl to your LightGrip Cricut mat, and firmly press in place to smooth any wrinkles or bubbles.
Cricut_How_to_make_a_personalised_baking_hamper_Cricut%20jars_step%207.jpg?sw=680&q=85
Jars: Step 8
Back on the Design Space app, click continue. You'll then be taken through to the machine set-up screen, select Premium Vinyl from the "Material Settings" menu and follow the on screen instructions to cut the designs.
Cricut_How_to_make_a_personalised_baking_hamper_Cricut%20jars_step%208.png?sw=680&q=85
Jars: Step 9
Follow the same process as for the enamel mug to apply the designs to the jars with transfer tape.
personalised-baking-hamper_jars.jpg?sw=680&q=85
Recipe Box: Step 1
Take the box apart using a screwdriver. Paint all of the components of the box and leave it to dry fully.
cricut_how_to_make_a_personalised_baking_hamper_cricut-recipe-box_step-1.png?sw=680&q=85
Recipe Box: Step 2
Follow the same process as for the glass jars to create and cut out the word ‘Recipes’.
cricut_how_to_make_a_personalised_baking_hamper_cricut-recipe-box_step-2.png?sw=680&q=85
Recipe Box: Step 3
Apply the ‘Recipes’ label to the top of the box using transfer tape, then reattach the lid to the box.
Recipe Box: Step 4
Open the Cricut Design Space app and start a new project. Open the ‘images’ menu and search for ‘#M136D279F’ and add it to the canvas by clicking the green "Insert" button.
cricut_how_to_make_a_personalised_baking_hamper_cricut-recipe-box_step-4.png?sw=680&q=85
Recipe Box: Step 5
Repeat this process to add image #M136D2774 to the canvas.
cricut_how_to_make_a_personalised_baking_hamper_cricut-recipe-box_step-5.png?sw=680&q=85
Recipe Box: Step 6
Once back through to the canvas, open the "Layers" menu and change the colour of each layer to match the vinyl you will be using. Resize the design so it will fit the sizes of your recipe box.
cricut_how_to_make_a_personalised_baking_hamper_cricut-recipe-box_step-6.png?sw=680&q=85
Recipe Box: Step 7
Follow the same process as the enamel mug and jars to cut out the abstract design from a range of vinyl colours. Weed away the negative areas from the vinyl designs, using your weeding tools.
cricut_how_to_make_a_personalised_baking_hamper_cricut-recipe-box_step-7.jpg?sw=680&q=85
Recipe Box: Step 8
Apply the design to the sides of the recipe box, using transfer tape (in the same way as for the mug and jars)
personalised-baking-hamper_recipe-box.jpg?sw=680&q=85
Apron: Step 1

Open the Cricut Design Space app and start a new project. Open the “Text' menu from the toolbar. Search “Ocean sans brook” in the search bar. Select the “Ocean sans brook” font.

cricut_how_to_make_a_personalised_baking_hamper_cricut_apron_step-1.png?sw=680&q=85
Apron: Step 2
Type ‘Ready, set,’ into the text box.
cricut_how_to_make_a_personalised_baking_hamper_cricut-apron_step-2.png?sw=680&q=85
Apron: Step 3
Open a new text box and select the “Alexis Mattox – Emma Rae” font.
cricut_how_to_make_a_personalised_baking_hamper_cricut-apron_step-3.png?sw=680&q=85
Apron: Step 4
Type ‘bake!’ into the box.
Cricut_How_to_make_a_personalised_baking_hamper_Cricut%20apron_step%204.png?sw=680&q=85
Apron: Step 5
Adjust the letter and line spacing until you are happy with how the words look, and then drag them together to form the phrase. You may need to adjust the size and rotation of each word so they fit together well. When you’re happy with the design, select all of the words and click ‘weld’.
cricut_how_to_make_a_personalised_baking_hamper_cricut-apron_step-5.png?sw=680&q=85
Apron: Step 6
Open the ‘images’ menu and search for ‘#M136D279F’ and add it to the canvas by clicking the green "Insert" button.
Cricut_How_to_make_a_personalised_baking_hamper_Cricut%20apron_step%206.png?sw=680&q=85
Apron: Step 7
Once back through to the canvas, open the "Layers" menu and delete all of the layers except for the wobbly lines.
Cricut_How_to_make_a_personalised_baking_hamper_Cricut%20apron_step%207.png?sw=680&q=85
Apron: Step 8
Select the wobbly lines and click the ‘contour’ button. Deselect all of the wobbly lines except for one.
Cricut_How_to_make_a_personalised_baking_hamper_Cricut%20apron_step%208.png?sw=680&q=85
Apron: Step 9
Close the contour box to return back to the canvas. Drag the single wobbly line underneath the word ‘bake’.
Cricut_How_to_make_a_personalised_baking_hamper_Cricut%20apron_step%209.png?sw=680&q=85
Apron: Step 10
Optional: add more abstract elements to the design in the same way.
Cricut_How_to_make_a_personalised_baking_hamper_Cricut%20apron_step%2010.png?sw=680&q=85
Apron: Step 11
When the design is complete, select all layers and resize it so that it will fit the front of your apron.
cricut_how_to_make_a_personalised_baking_hamper_cricut-apron_step-11.png?sw=680&q=85
Apron: Step 12
Click the green ‘Make it’ button. You'll then be taken through to the mat preview screen. Click ‘Mirror’ to reverse the design.
cricut_how_to_make_a_personalised_baking_hamper_cricut-apron_step-12.png?sw=680&q=85
Apron: Step 13
Fit your Cricut machine with the fine point blade.
cricut_how_to_make_a_personalised_baking_hamper_cricut-apron_step-13.jpg?sw=680&q=85
Apron: Step 14
Back on the Design Space app click continue. You'll then be taken through to the machine set-up screen, select everyday iron-on from the "Material Settings" menu and follow the on screen instructions to cut the designs from different colours of iron-on vinyl. Be sure to apply the iron-on to the Cricut mat with the shiny side facing down.
cricut_how_to_make_a_personalised_baking_hamper_cricut-apron_step-14.png?sw=680&q=85
Apron: Step 15
When the design is cut, use your weeding tools to remove the negative areas.
cricut_how_to_make_a_personalised_baking_hamper_cricut-apron_step-15.jpg?sw=680&q=85
Apron: Step 16
Heat your EasyPress 2 to the correct time and temperature settings as explained in the interactive Heat Guide on the Cricut website.
Apron: Step 17
Follow the Heat Guide instructions to apply the first layer (the circles and the wobbly line). When the project has cooled slightly (but still warm to the touch), slowly peel away the backing plastic. If the iron-on design begins to lift away, press it back down and reapply the EasyPress 2 for a few seconds. Let it cool and try to peel the plastic away again.
Apron: Step 18
Repeat this process to apply the words, over the top of the first layer. Important: make sure the first layer of iron-on is completely covered by the protective backing plastic before you apply heat. Never apply heat directly to the iron-on, as this can melt it! You can reuse the plastic you peeled away in the previous step to re-cover the first layer, if necessary.

Related Products

Related Categories

  • bvseo_sdk, dw_cartridge, 18.2.0, p_sdk_3.2.0
  • CLOUD, getReviews, 4ms
  • reviews, product
  • bvseo-msg: Unsuccessful GET. status = 'ERROR', msg = 'Not Found.'; Unsuccessful GET. status = 'ERROR', msg = 'Not Found.';
Top