How to Make a Candle
Ever wanted to have a go at making your own wax masterpieces? Perfect for personalisation, you can create candles to your exact preference including colour, shape and fragrance. Simply follow these easy instructions and get started on your first batch!
Candles make great gifts and you can make them completely bespoke. Choose a scent, colour and design that the recipient will love!
You will need
Subtotal
Is $ 1.49
Subtotal
Is $ 20.00
Out of stock
Subtotal
Is $ 15.00
Subtotal
Is $ 15.00
How to make
1. Weigh out the wax for your container. You will need as much in grams as your container fits in ml, eg 400g for a 400ml container.
2. Start melting your wax in either a bain marie, wax kettle or a specialised wax melting pot.
3. Prepare your container. You will need to use a wick with a sustainer, and use a small amount of double sided tape or other adhesive to stick the bottom of the sustainer to the bottom of the inside of the container.
4. Trim down your wick to size.
5. Use a lollipop stick to hold your wick in place across the top of the container.
6. Now weigh your dye if you want to add colour to your candles. You will need approximately 1g of dye per 500g of wax.
7. When the wax is all melted and has reached 140 degrees fahrenheit, measure out the wax needed for your mould using a ladle and a measuring jug. Stir in your dye.
8. If you want to add a scent, stir in your fragrance at this point. You will need between 5-8ml of fragrance per 100 grams of wax.
9. Pour the wax into your mould. Leave to set for about 4 hours.
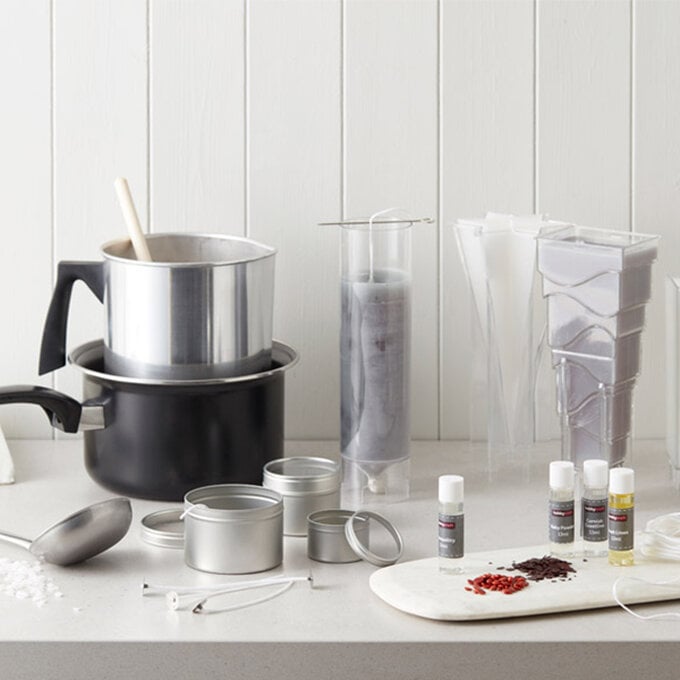
1. Weigh out the wax for your container. You will need as much in grams as your container fits in ml, eg 400g for a 400ml container.
2. Start melting your wax in either a bain marie, wax kettle or a specialised wax melting pot.
3. Prepare the wick. Thread a lenth of wick through the hole in the bottom of the mould. Use a wick pin, pencil or pen to secure the wick in place and rest the pin across the top of the mould.
4. Pull the other end of the wick taut at the bottom of the mould. Secure in place with mould sealer. Trim off the excess wick.
5. Now weigh your dye if you want to add colour to your candles. You will need approximately 1g of dye per 500g of wax.
6. When the wax is all melted and has reached 140 degrees fahrenheit, measure out the wax needed for your mould using a ladle and a measuring jug. Stir in your dye.
7. If you want to add a scent, stir in your fragrance at this point. You will need between 5-8ml of fragrance per 100 grams of wax.
8. Pour the wax into your mould. Leave to set for about 4 hours.
9. Once set, remove the mould sealant, trim the wick and slide your candle out of the mould.
Prepare your working area with newspaper to protect your work.
Half fill the saucepan with water and heat – double-check that the heatproof bowl sits in the pan with the water coming up to just over halfway. Pop the wax in the bowl and dish out three teaspoons of stearic acid and stir with one of the wooden sticks. Keep an eye on the level of water in your saucepan.
Whilst the wax is melting, you can prep your mould and wick.
Cut a length of wick 2cm longer than the height of your mould. Feed into a wick container and crimp shut with pliers. Dip the wick, including the wick holder, into molten wax and place to one side to dry. Seal the hole in the base at the candle.
Fill your mould to the top, leaving a little wax left to top up later.
Leave until a fine skin has formed on the wax.
Pop in your wick, so that the wick container sits at the bottom in the centre.
You can put the top of the wick through the hole in one of the wooden sticks to stop the wick moving whilst the wax sets. During 'setting up' (the term used for when the wax sets) a well will form around the wick.
When your candle has set a little, prick the surface near the wick with a cocktail stick and top-up with your leftover wax to level the hole.
Leave the candle for a day to thoroughly cool before turning the candle upside down and giving it a hard knock on a firm surface to turn out the candle.
If your candle is a little reluctant to come free from the mould, it can be placed in the fridge for an hour to loosen it up.
Decorate with ribbon and lace buttons and twine for the perfect finishing touch to your dining table.


